Flop!
Well, I started on one of my biggest summer tasks a little early...
This task is to cook my way through a breadmaking cookbook. Sounds simple, right? Except... the recipes are written in German! I'm trying to scrape together my 4 or 5 yrs of high school Deutsch, and both translate and cook at the same time. It's a good challenge, and plenty of fun. Plus, a lot to learn; German bread is (in my opinion) the best kind of bread there is, so there are plenty of tips to be found in there. There's some breadmaking gene that is particularly strong in Germans, I'm sure of it.
Anyway, we needed bread, and I wanted something new, so I pulled out the book. Flipped through it looking for an easily-translated recipe, and one for which we had all the ingredients (this took considerably more time to ascertain than usual, as I had to translate every ingredient before I could say whether we actually had said ingredient). The gluten free Quinoa and Buckwheat loaf caught my eye - but I can't eat Quinoa. Hrmmmm. Translating, substituting, and baking? My job got a little harder. But it sounded goooood! So I went ahead. I managed to translate the whole recipe in my head without a dictionary - success! And figured I could just substitute the cooked quinoa for a slightly larger quantity of uncooked millet or amaranth. No problems. The recipe called for potatoes, which got cooked and mashed - perfect, my job made even easier by the thermomix! Then we got cooking. We cooked the potatoes in the TM, which also mashed them for me, then carried on with the recipe. The dough almost filled my 2L capacity machine... Way more bread than we can eat! I put it in 3 loaf pans and on the counter to rise. Sent out a group text to my mothers group, offering our extra 2 loaves at a very low cost and they were snapped up in 5 or 10 minutes - awesome!
We put the loaves into the oven to cook, turned the oven down after 5 mins, everything was looking great. Checked on them 25 minutes later, aaaand...... FLOP!
Uh oh. The tops of the loaves had stayed up... but there was a huge hole in the middle of each loaf.

Panic!
I sent out apologetic texts to the friends who had so eagerly jumped at the chance to have one of my loaves, really disappointed for myself but also for them. But one of them replied - perfect for stuffing!!! In my upset over the collapse, I hadn't even thought of this at all. They were not sell-able, but they were rescue-able. Hooray!
Mmmmm, look at that crispy prosciutto!

It was delicious! I ripped the hollow crust off the top (except around the sides), exposing the entire hole. Layed a couple of slices of prosciutto on the bottom of the hole. Then grated some parmesan and cheddar cheeses in the TM, added in some quark, sundried tomatoes and baby spinach, and chopped those up/mixed it through. Spooned it on top of the prosciutto to fill the hole, and placed 2 more strips of prosciutto along the top. Whacked it in the oven, and there you have it - lunch!
This is a great idea for rescuing any sunken, hole-y bread. Just stuff it with whatever you want, bake it in the oven (if you want/if your filling warrants baking), slice it, and enjoy it!I figured out the problem, by the way. Nothing wrong with my translation, which was a relief. But I was so busy thinking about the tranlsation that I stopped thinking about cooking and made a very silly, elementary mistake. My potatoes got mashed as they cooked in the TM. This meant that none of the cooking water could be drained off. So, while I was throwing the dough together in a German-English haze, I added the full amount of water called for in the recipe. Therefore, the dough was way too wet, and sunk. Flop! Oh well. I know for next time, and the bread was rescued, so all is good in the world!
While the rescued bread was in the oven and Mr T was having an uncharacteristic nap, I also made some dill pickles! This is the first time I have done this, so it's very exciting. I saw some beautiful baby cucumbers at the markets on the weekend, and thought they would make excellent pickles. Naturally, I bought them, without knowing anything about pickling cukes. A few google searches and youtube videos later, I felt confident enough to go ahead. There are several ways you can pickle cukes; you can cook them and pack them in the jars hot along with the brine, or you can "cold pack" the cukes (pack them in the jars cold) with no brine. Obviously, I went with the cold pack method, because it's just easier. Then you can boil up the brine, pour it over the cukes, seal and store. Or you can boil up the brine, pour it over the cukes, and then boil the filled and sealed jars in a water bath. I went with the first method for several reasons: I don't have a rack to set in my pot so that the jar sits off the bottom of the pot, and it's just easier.
Another thing I discovered in my youtube researching is that in the US they have this terrible product which is apparently made of the same compound that you use to shock-treat swimming pools which people actually PUT IN THEIR FOOD without hesitation. I just can't get past this. It is used when pickling cucumbers, because it kills the enzymes in the flower end of the cuke that can cause the cukes to go soft when they're pickling.
Alternatively, you can just cut a centimetre off the flower end of the cucumber and your cukes will stay crunchy....
To me, this is obviously much more ideal. So, my cukes are naked at one end (some are naked at both ends due to less than desirable stem ends, poor cukes). I don't have the option of adding the aforementioned horrible enzyme-killing chemical, but needless to say I would never advocate for the use of this, especially when there's a much more natural and less alarming solution to the soggy cuke problem.

Anyway, let's get back on track. I put five garlic cloves at the bottom of the jar, put about a handful of dill on top of that, and packed in my (cold) cukes. Boiled up a mixture of apple cider vinegar, water and salt, and poured this over the cukes in the jar (you need to completely cover the cukes but leave a bit of headspace - a centimetre or two is plenty). Sealed it, and... now I have to wait at least a week to consume them! But they look great.

Even after less than 8 hours, they're already less green and more... pickly? Looking good!
We also bought some cherries at the markets last weekend. We initially bought them for eating, but we have so much fruit in the house already anyway, so more canning was on the order. And I've been wanting to make brandied cherries for a while.
By this time Mr T was awake, so he helped me sort out which cherries were best for canning and which we could eat! And then he helped me wash them and prick holes in them (his favourite part, of course). Then we covered the base of the jar with a single layer of cherries and sprinkled rapadura sugar over them. Repeated with another layer, more rapadura, etc etc until all cherries were used up. About a tablespoon or two per layer of cherries. If your jar is wide and short (so you want get as many layers), use 2 tablespoons. If your jar is tall and thin (so you'll get more layers), just use 1 tablespoon. It's not an exact science; do what feels right. Then cover (and then some!) the lot with brandy. Give it a good shake and stick it in a cool, dark cupboard. Shake it every day for a week, and then you're ready to start using it.

You don't have to use it all at once - it will keep for about six months because of the alcohol and sugar, as long as you use clean utensils to get out either the brandy or the cherries (or both). You always want the cherries to stay covered - not a problem if you use the cherries more than you use the cherry-infused brandy. If you find you use more of the brandy, I don't see why you couldn't just top it up with brandy. But if you do this, I'd go back to shaking it every day for a while, and wait about a week before you dip in again. So this makes two things made today that can't be touched for a week - it's going to be very good for my soul. :)
Last, but not least, I want to encourage you all to have a quick squiz at a blog I have recently stumbled across. It is run by a woman named Jo, who is known for her Quirky Cooking. She's a thermomix devotee, but her blog is worth looking at even if you don't own a TM. She does a lot of gluten-free, dairy-free etc recipes, so she's a great source of inspiration for exciting and fun allergy-friendly recipes.
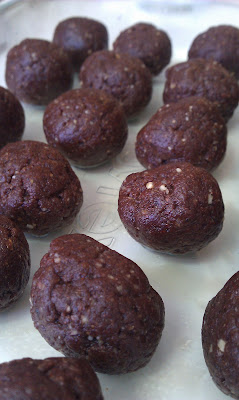
We made Jo's raw cacao nib Bliss balls, using pecans and hazelnuts instead of walnuts. They were deeeelicious! And they are quite sweet due to the dates, so only 20g of sugar is called for in the recipe (and you could possibly get away with not using any!).

I stuck them in a big pyrex dish so that they were not touching each other while they cooled and set in the fridge, so that they wouldn't get stuck together. Cacao butter is present in cacao nibs, and melts somewhere between 35 and 40 degrees celsius (if my memory serves me correctly), so after you roll them into balls you definitely do want to put them in the fridge for a while. After they cooled, I put them in one of my stainless steel lunchboxes so they'd take up less space in the fridge...


... and Mr T stole the pyrex dish so he could eat the bits stuck on the bottom. That's how much he loves these bliss balls! I'm certainly going to go back for another couple as soon as I post this blog entry.
So with that, I'm off! But I'll leave you with the parting message that canning fruits and veg can be as easy or as complex as you make it, but every little thing that you can or preserve yourself is one less additive-laden product that you purchase. One less possibly unethical company that you support. One less batch of packaging that gets wasted. And besides, it feels wonderful to pull something out of your fridge that most people would just buy at the shops, and think to yourself, "hey... I made that!" :)
0 Response to "Flop!"
Post a Comment